
How to use a Seeder Service to Pre-Populate Your Database in NestJs
Whether it is for setting up test data or you just want to keep consistent data that you know you’re going to need in your application, you are probably like me and don’t want to have to keep manually creating each row in your local, staging (testing), and production (live) environments.
So let’s create a simple NestJs project and I’ll show you how to set up a Seeder Service!
First we’ll need to install Nest CLI globally if it isn’t already.
npm install -g @nestjs/cli
Now lets make our project directory and cd into it:
mkdir seeder-app
cd seeder-app
Now we’ll create the NestJS project for backend API
nest new seeder-api
Use npm as the preferred package manager and wait for install cd into the directory
cd seeder-api
Our project will have one very simple resource called “Flags” that we will then create a seeder for to automatically save seven flags all named after a color from the ROYGBIV sequence of color hues.
In Nest, we create “Resources” to organize our code. g here stands for “generate”, res stands for “resource.” You can use whichever version you prefer.
nest generate resource flags --no-spec
nest g res flags --no-spec
We’re using the --no-spec flag to skip creating test files
Select REST API for the transport layer
❯ REST API
  GraphQL (code first)
  GraphQL (schema first)
  Microservice (non-HTTP)
  WebSockets
And Y to: Would you like to generate CRUD entry points? (Y/n)
Let’s set up the Flag Entity Now:
// seeder-api/src/flags/entities/flag.entity.ts
export class Flag {
    id: number;
    name: string;
    slug: string;
}
This is great, but how will we save it to the database?
Let’s use TypeORM as our ORM. First we’ll need to install the necessary packages:
npm i typeorm
npm i @nestjs/[email protected]
Now we can add TypeORM Decorators to our fields:
// seeder-api/src/users/entities/user.entity.ts
import { Entity, PrimaryGeneratedColumn, Column} from 'typeorm'

@Entity()
export class Flag {
    @PrimaryGeneratedColumn()
    id: number;

    @Column()
    name: string;

    @Column()
    slug: string;
}
You can read more about Type ORM Decorators in the TypeORM Decorator Reference Now we’ll need to set up our database. For this example we’ll be using sqlite3 as it does not require setting up a server and database.
First we will install the sqlite3 package as well as the @nestjs/config package. This package will allow us to use dotenv to grab environment variables from a .env file as well as create a ConfigModule to pass into our application.
npm i sqlite3
npm i @nestjs/config
Now we can create a .env in the root of our seeder-api directory:
// seeder-api/.env

DB_TYPE=sqlite
DB_NAME=data/seeder.sqlite
DB_SYNCHRONIZE=true
DB_LOGGING=true
Lets create a configuration file that we can pass into the ConfigModule
// seeder-api/src/config/configuration.ts

export default () => ({
  database: {
    type: process.env.DB_TYPE,
    database: process.env.DB_NAME,
    synchronize: process.env.DB_SYNCHRONIZE === 'true',
    logging: process.env.DB_LOGGING === 'true',
    host: process.env.DB_HOST || null,
    port: process.env.DB_PORT || null,
    username: process.env.DB_USER || null,
    password: process.env.DB_PASSWORD || null,
    entities: ['dist/**/*.entity{.ts,.js}'],
  },
});
Update app.module.ts to use our new configuration as well as ConfigModule and TypeOrmModule:
// seeder-api/src/app.module.ts

import { Module } from '@nestjs/common';
import { AppController } from './app.controller';
import { AppService } from './app.service';
import { ConfigModule, ConfigService } from "@nestjs/config";
import { TypeOrmModule } from "@nestjs/typeorm";
import { FlagsModule } from "./flags/flags.module";
import configuration from './config/configuration';

@Module({
  imports: [
    ConfigModule.forRoot({
      envFilePath: ['.env.local', '.env.dev', '.env.prod', '.env'],
      load: [configuration],
      isGlobal: true,
    }),
    TypeOrmModule.forRootAsync({
      imports: [ConfigModule],
      useFactory: async (config: ConfigService) => config.get('database'),
      inject: [ConfigService],
    }),
    FlagsModule,
  ],
  controllers: [AppController],
  providers: [AppService],
})
export class AppModule {
}
OK cool! Now let’s implement CRUD that will take requests and operate on Flags. I like to use @rewiko/crud because it helps automate the basics.
npm i @rewiko/[email protected] @rewiko/crud
With the packaged installed we can update the Flag Controller to use nestjs/crud:
// seeder-api/src/flags/flags.controller.ts

import { FlagsService } from './flags.service';
import { Crud, CrudController } from "@rewiko/crud";
import { Flag } from "./entities/flag.entity";
import { Controller } from "@nestjs/common";

@Crud({
  model: {
    type: Flag,
  },
})
@Controller('flags')
export class FlagsController implements CrudController<Flag> {
  constructor(public service: FlagsService) {}
}
You may be seeing some errors in your linter, that's okay. We still need to update FlagsService in order for this to work properly.
// seeder-api/src/flags/flags.service.ts
import { Injectable } from '@nestjs/common';
import { TypeOrmCrudService } from "@nestjsx/crud-typeorm";
import { Flag } from "./entities/flag.entity";
import { InjectRepository } from "@nestjs/typeorm";
import { Repository } from "typeorm";

@Injectable()
export class FlagsService extends TypeOrmCrudService<Flag> {
  constructor(
      @InjectRepository(Flag)
      public repo: Repository<Flag>
  ) {
    super(repo);
  }
}
Finally, import TypeORMModule Into the User Module:
// seeder-api/src/flags/flags.module.ts
import { Module } from '@nestjs/common';
import { FlagsService } from './flags.service';
import { FlagsController } from './flags.controller';
import { TypeOrmModule } from "@nestjs/typeorm";
import { Flag } from "./entities/flag.entity";

@Module({
  imports: [TypeOrmModule.forFeature([Flag])],
  controllers: [FlagsController],
  providers: [FlagsService]
})
export class FlagsModule {}
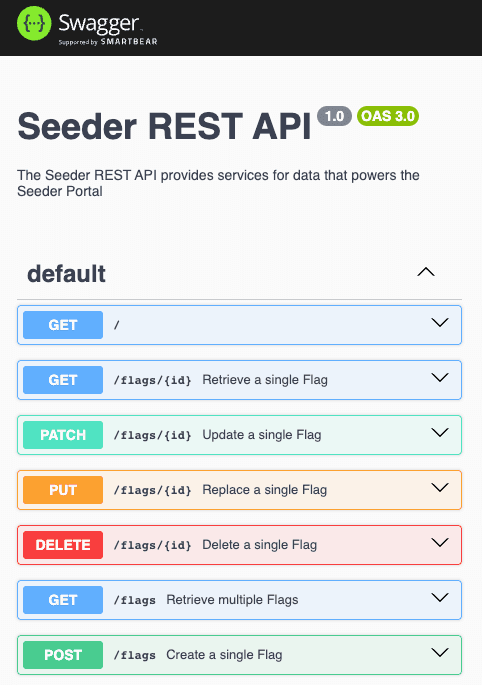
OK, it should be close! Let’s set up Swagger as a quick way to test and experiment with our API!
npm i @nestjs/swagger swagger-ui-express
// seeder-api/src/main.ts

import { NestFactory } from '@nestjs/core';
import { AppModule } from './app.module';
import { DocumentBuilder, SwaggerModule } from "@nestjs/swagger";

async function bootstrap() {
    const app = await NestFactory.create(AppModule);

    const config = new DocumentBuilder()
        .setTitle('Seeder REST API')
        .setDescription(
            'The Seeder REST API provides services for data that powers the Seeder Portal',
        )
        .setVersion('1.0')
        .build();
    const document = SwaggerModule.createDocument(app, config);
    SwaggerModule.setup('api', app, document);

    await app.listen(3000);
}

bootstrap();
OK! Start the dev server!
npm run start:dev
And navigate to localhost:3000/api/
You should see the swagger API.
Expand the “GET /flags Retrieve Multiple Flags” route and click “Try it out,” then scroll down and click the “Execute” button that appears. You should see that swagger made a request and the response returned is an empty array.
Request:
curl -X 'GET' \
  'http://localhost:3000/flags' \
  -H 'accept: application/json'
Response body:
[]
Seeder Service
So lets make our seeder service to automatically populate this application with some flags!
Create a seeder service
// seeder-api/src/flags/flags-seeder.service.ts

import { Injectable } from '@nestjs/common';
import { InjectRepository } from '@nestjs/typeorm';
import { Repository } from 'typeorm';
import { Flag } from './entities/flag.entity';

@Injectable()
export class FlagsSeederService {
  constructor(
    @InjectRepository(Flag)
    private readonly repo: Repository<Flag>,
  ) {}
}
Now we’re going to want some data to see our application with. Lets create a constant in our entity class file to seed the data with. This will be helpful in case we ever need to refer to the slug as a constant when looking at any of these flags regardless of their id. For the sake of keeping this generic, I’m just going to use the ROYGBIV order of the color spectrum to name the flags.
// seeder-api/src/flags/entities/flag.entity.ts

import { Entity, PrimaryGeneratedColumn, Column } from 'typeorm';

// Add this exported const!
export const FLAGS = {
  RED: { name: 'Red', slug: 'RED' },
  ORANGE: { name: 'Orange', slug: 'ORANGE' },
  YELLOW: { name: 'Yellow', slug: 'YELLOW' },
  GREEN: { name: 'Green', slug: 'GREEN' },
  BLUE: { name: 'Blue', slug: 'BLUE' },
  INDIGO: { name: 'Indigo', slug: 'INDIGO' },
  VIOLET: { name: 'Violet', slug: 'VIOLET' },
};

@Entity()
export class Flag {
  @PrimaryGeneratedColumn()
  id: number;

  @Column()
  name: string;

  @Column()
  slug: string;
}
Now back in our flags-seeder.service.ts we can import this const and use it to quickly populate our data.
// seeder-api/src/flags/flags-seeder.service.ts

import { Injectable } from '@nestjs/common';
import { InjectRepository } from '@nestjs/typeorm';
import { Repository } from 'typeorm';
import { Flag } from './entities/flag.entity';
import { FLAGS } from './entities/flag.entity';

@Injectable()
export class FlagsSeederService {
  constructor(
    @InjectRepository(Flag)
    private readonly repo: Repository<Flag>,
  ) {}

  // Add this new method
  async createFlags() {
    const flags = await this.repo.find();

    if (flags.length === 0) {
      const red = this.repo.create(FLAGS.RED);
      const orange = this.repo.create(FLAGS.ORANGE);
      const yellow = this.repo.create(FLAGS.YELLOW);
      const green = this.repo.create(FLAGS.GREEN);
      const blue = this.repo.create(FLAGS.BLUE);
      const indigo = this.repo.create(FLAGS.INDIGO);
      const violet = this.repo.create(FLAGS.VIOLET);

      await this.repo.save([red, orange, yellow, green, blue, indigo, violet]);
    }
  }
}
In our new createFlags() method we’re first checking to see if any flags exist. If not, we’re going to create them using this.repo.create() and passing in the constants we created in the entity. Finally at the end we call this.repo.save() and pass in all the flags we just created.
Now we need to make sure this service runs automatically. First lets modify our flags.module.ts to include this service as a provider as well as an export so it can be available to our application:
// seeder-api/src/flags/flags.module.ts

import { Module } from '@nestjs/common';
import { FlagsService } from './flags.service';
import { FlagsController } from './flags.controller';
import { TypeOrmModule } from '@nestjs/typeorm';
import { Flag } from './entities/flag.entity';
import { FlagsSeederService } from "./flags-seeder.service";  // <--- Import FlagsSeederService

@Module({
  imports: [TypeOrmModule.forFeature([Flag])],
  controllers: [FlagsController],
  providers: [FlagsService, FlagsSeederService],  // <--- Add FlagsSeederService
  exports: [FlagsSeederService],  // <--- Add this export
})
export class FlagsModule {}
Finally we’re going to add an onModuleInit() implementation to our AppModule:
// seeder-api/src/app.module.ts

import { Module, OnModuleInit } from '@nestjs/common';  // <-- Add OnModuleInit import
import { AppController } from './app.controller';
import { AppService } from './app.service';
import { ConfigModule, ConfigService } from '@nestjs/config';
import { TypeOrmModule } from '@nestjs/typeorm';
import { FlagsModule } from './flags/flags.module';
import configuration from './config/configuration';
import { FlagsSeederService } from "./flags/flags-seeder.service";  // <-- import the FlagsSeederService

@Module({
  imports: [
    ConfigModule.forRoot({
      envFilePath: ['.env.local', '.env.dev', '.env.prod', '.env'],
      load: [configuration],
      isGlobal: true,
    }),
    TypeOrmModule.forRootAsync({
      imports: [ConfigModule],
      useFactory: async (config: ConfigService) => config.get('database'),
      inject: [ConfigService],
    }),
    FlagsModule,
  ],
  controllers: [AppController],
  providers: [AppService],
})
export class AppModule implements OnModuleInit {  // <-- implement OnModuleinit
  constructor(
      private readonly flagsSeederService: FlagsSeederService,  // <-- Add FlagsSeederService to the constructor
  ) {
  }

  async onModuleInit() {
    await this.flagsSeederService.createFlags();  // <-- call the createFlags method we created
  }
}
In this change, we extend the AppModule with the OnModuleInit interface in our AppModule and pass in the FlagsSeederService to the constructor. Then we create an async onModuleInit() to satisfy the requirements of the OnModuleInit interface. Here in this async onModuleInit function we can make an await call to our flagsSeederService.createFlags() method that we created earlier.
Save the file and let the application restart. (You may need to restart it manually if you’re not running using npm run start:dev)
You shouldn’t see any errors in the logs at this point and the app should be running.
Go back to your swagger GET route and execute the query again. You should now see that the flags have been automatically added!
Request:
curl -X 'GET' \
  'http://localhost:3000/flags' \
  -H 'accept: application/json'
Response body:
[
  {
    "id": 1,
    "name": "Red",
    "slug": "RED"
  },
  {
    "id": 2,
    "name": "Orange",
    "slug": "ORANGE"
  },
  {
    "id": 3,
    "name": "Yellow",
    "slug": "YELLOW"
  },
  {
    "id": 4,
    "name": "Green",
    "slug": "GREEN"
  },
  {
    "id": 5,
    "name": "Blue",
    "slug": "BLUE"
  },
  {
    "id": 6,
    "name": "Indigo",
    "slug": "INDIGO"
  },
  {
    "id": 7,
    "name": "Violet",
    "slug": "VIOLET"
  }
]
Tada! Your application now automatically pre-populates data the first time it launches! As you can see this is a fairly straightforward process that is easy to scale across multiple resources in order to avoid the headache of remembering to include or populate options in your database when it comes time to deploy.